Listen up, tech enthusiasts! If you're diving into the world of IoT (Internet of Things) and wondering how to manage IoT devices behind a firewall using Ubuntu, you’ve come to the right place. This isn’t just about setting up gadgets; it’s about securing them, optimizing performance, and ensuring everything runs smoothly. Whether you’re managing smart home devices, industrial IoT setups, or just experimenting with hobbyist projects, this guide will help you navigate the process. Let’s dig in!
Managing IoT devices is no longer optional—it’s essential. With the rise of cyber threats and the increasing number of connected devices, securing your network has become critical. If you're using Ubuntu as your server OS, you’re in good hands. This Linux distro offers robust tools and configurations to keep your IoT devices safe and functional. So, let’s explore how to manage IoT devices behind a firewall with Ubuntu, shall we?
Before we jump into the nitty-gritty, remember that this isn’t just about tech jargon. It’s about giving you the tools to protect your devices, streamline operations, and ensure your IoT setup works like a charm. Ready to take control? Let’s go!
Read also:Angus Jones The Rising Star You Need To Know About
Understanding IoT Devices and Their Management
First things first, let’s break down what IoT devices are and why managing them behind a firewall is crucial. IoT devices range from smart thermostats to industrial sensors, and they all share one thing in common: they’re connected to the internet. But with great connectivity comes great responsibility. These devices can become easy targets for hackers if not properly secured.
Managing IoT devices behind a firewall ensures that only authorized traffic reaches your devices. This setup protects sensitive data and prevents unauthorized access. Ubuntu, with its powerful firewall tools, makes this process straightforward. You’ll learn how to configure your firewall, set up secure connections, and monitor device activity—all within the Ubuntu environment.
Why Choose Ubuntu for Managing IoT Devices?
Ubuntu is more than just a Linux distro; it’s a powerhouse for managing IoT devices. Here’s why:
- **Stability**: Ubuntu is known for its reliability, making it ideal for long-term IoT projects.
- **Security**: With built-in tools like UFW (Uncomplicated Firewall), Ubuntu offers robust security features.
- **Community Support**: A vast community of developers and enthusiasts means you’ll never run out of resources or help.
- **Compatibility**: Ubuntu supports a wide range of IoT platforms and protocols, ensuring seamless integration.
These advantages make Ubuntu the go-to choice for anyone looking to manage IoT devices behind a firewall.
Setting Up Your Ubuntu Environment
Before you start managing IoT devices, you’ll need to set up your Ubuntu environment. Here’s a quick rundown of the steps:
Step 1: Install Ubuntu Server
Begin by installing Ubuntu Server on your machine. You can download the latest version from the official Ubuntu website. During installation, make sure to enable the OpenSSH server for remote access. Trust me, you’ll thank me later!
Read also:Oj Simpson First Wife The Untold Story You Need To Know
Step 2: Update Your System
Once installed, update your system to ensure you have the latest packages and security patches. Run the following commands:
sudo apt update && sudo apt upgrade
This step is crucial to keep your system secure and up-to-date.
Configuring the Firewall
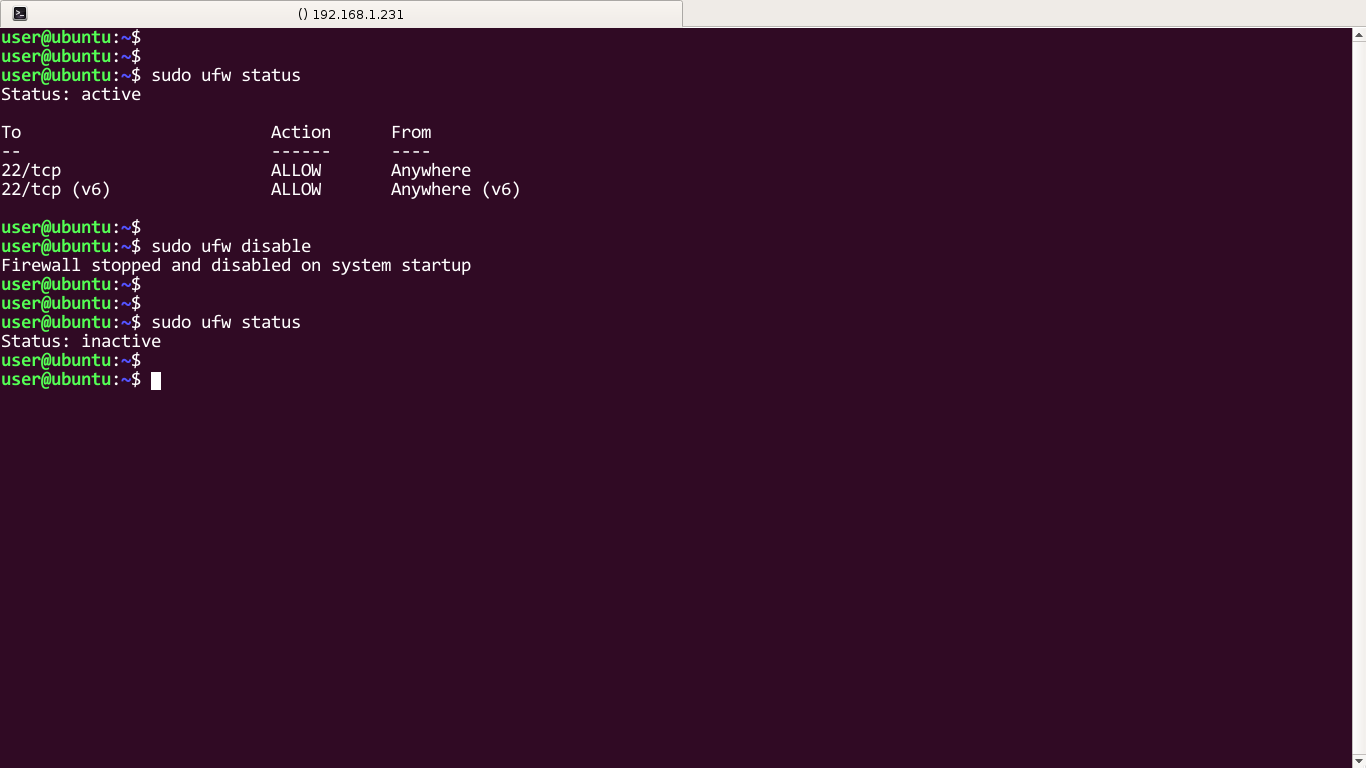
Now that your Ubuntu environment is ready, it’s time to configure the firewall. UFW (Uncomplicated Firewall) is the default firewall management tool in Ubuntu. Here’s how to set it up:
Step 1: Enable UFW
Start by enabling UFW with the following command:
sudo ufw enable
This command activates the firewall and blocks all incoming connections by default.
Step 2: Allow Necessary Ports
Depending on your IoT setup, you’ll need to allow specific ports for communication. For example, if you’re using MQTT for messaging, you’ll need to allow port 1883:
sudo ufw allow 1883
Repeat this step for any other ports required by your devices.
Managing IoT Devices with MQTT
MQTT (Message Queuing Telemetry Transport) is a lightweight protocol perfect for IoT devices. Here’s how to set it up on Ubuntu:
Step 1: Install Mosquitto
Mosquitto is a popular MQTT broker. Install it using the following command:
sudo apt install mosquitto mosquitto-clients
Step 2: Configure Mosquitto
Edit the Mosquitto configuration file to set up user authentication and SSL encryption. This ensures secure communication between your IoT devices and the broker.
sudo nano /etc/mosquitto/mosquitto.conf
Add the following lines to enable SSL:
listener 8883
cafile /path/to/ca.crt
certfile /path/to/server.crt
keyfile /path/to/server.key
Save and exit the file, then restart Mosquitto:
sudo systemctl restart mosquitto
Monitoring IoT Device Activity
Monitoring your IoT devices is key to ensuring they’re functioning correctly. Here’s how to do it:
Step 1: Use Log Files
Ubuntu keeps logs of system activity, including IoT device communication. Check these logs regularly for any unusual activity:
sudo tail -f /var/log/syslog
Step 2: Implement Alerts
Set up alerts to notify you of any issues. Tools like Nagios or Zabbix can help automate this process, ensuring you’re always in the loop.
Best Practices for Securing IoT Devices
Securing your IoT devices goes beyond configuring a firewall. Here are some best practices to keep in mind:
- **Use Strong Passwords**: Ensure all devices and accounts have strong, unique passwords.
- **Regularly Update Firmware**: Keep your devices’ firmware up-to-date to patch vulnerabilities.
- **Segment Your Network**: Use VLANs or subnets to isolate IoT devices from other network traffic.
- **Limit Access**: Restrict access to your IoT devices to trusted users only.
By following these practices, you’ll significantly reduce the risk of cyberattacks.
Real-World Example: Managing Smart Home Devices
Let’s look at a real-world example. Imagine you’re managing a smart home setup with devices like smart bulbs, thermostats, and security cameras. By configuring UFW and setting up MQTT on Ubuntu, you can:
- Control devices remotely using a secure connection.
- Monitor device activity and receive alerts for unusual behavior.
- Ensure sensitive data, like camera footage, remains protected.
This setup not only enhances security but also improves the overall user experience.
Troubleshooting Common Issues
Even with the best setup, issues can arise. Here are some common problems and how to fix them:
Issue 1: Devices Not Connecting
Check your firewall rules to ensure the necessary ports are open. Also, verify that your devices are correctly configured to connect to the MQTT broker.
Issue 2: Slow Performance
Optimize your Ubuntu server by disabling unnecessary services and ensuring your hardware meets the requirements for your IoT setup.
Conclusion
Managing IoT devices behind a firewall on Ubuntu is a powerful way to secure your network and optimize performance. By following the steps outlined in this guide, you’ll be well on your way to creating a robust IoT setup. Remember to stay vigilant and keep your system up-to-date to protect against emerging threats.
So, what are you waiting for? Dive into the world of IoT management with Ubuntu and take control of your devices. Leave a comment below to share your experience or ask any questions. And don’t forget to check out our other articles for more tech tips and tricks!
Table of Contents
- Understanding IoT Devices and Their Management
- Why Choose Ubuntu for Managing IoT Devices?
- Setting Up Your Ubuntu Environment
- Configuring the Firewall
- Managing IoT Devices with MQTT
- Monitoring IoT Device Activity
- Best Practices for Securing IoT Devices
- Real-World Example: Managing Smart Home Devices
- Troubleshooting Common Issues
- Conclusion