Let’s be real, ladies and gents, curling your hair with a flat iron is a game-changer. Whether you're aiming for beachy waves or sleek curls, this technique has got you covered. And guess what? You don’t need a fancy curling iron to achieve salon-worthy results. With just a trusty flat iron and a little know-how, you can rock those curls like a pro. So, buckle up because we’re diving deep into the world of flat iron curls!
Now, I know what you're thinking—can a flat iron really give you the same results as a curling wand? The answer is a resounding yes! Flat irons are versatile tools that can straighten, curl, and even create waves. Plus, they’re super easy to use once you get the hang of it. So, if you’ve been intimidated by the thought of curling your hair with a flat iron, fear not. We’ve got all the tips and tricks you need to master this technique.
Before we jump into the nitty-gritty, let’s talk about why this method is so awesome. First off, it’s budget-friendly. If you already own a flat iron, you don’t need to splurge on another tool. Secondly, it’s great for versatility. From tight curls to loose waves, the flat iron can do it all. And lastly, it’s a skill that will impress everyone—your friends, your family, and even yourself. So, are you ready to unlock the secrets of flat iron curling? Let’s go!
Read also:Brooke Monk Bikini The Ultimate Guide To Her Style Journey And Influencer Secrets
Why Use a Flat Iron to Curl Hair?
Alright, let’s break it down. Why should you even bother using a flat iron to curl your hair when there are curling irons out there? Well, my friend, the flat iron is like the Swiss Army knife of hairstyling tools. Not only can it straighten your hair, but it can also create curls, waves, and even add texture. Plus, it’s a lot easier to control than a traditional curling iron, which means less chance of burning your scalp or creating awkward flyaways.
Another reason to love flat iron curls? They last longer. The flat iron heats up your hair evenly, which helps set the style in place. And because you’re not using a traditional curling iron, you can experiment with different techniques to achieve various looks. From bouncy curls to sleek waves, the possibilities are endless. So, if you’re looking for a versatile tool that can do it all, the flat iron is your new best friend.
Choosing the Right Flat Iron for Curling
Not all flat irons are created equal, especially when it comes to curling. When you're shopping for the perfect flat iron, there are a few things you should keep in mind. First, look for a flat iron with adjustable temperature settings. This will allow you to customize the heat based on your hair type. If you have fine or damaged hair, you’ll want to keep the temperature on the lower side. On the other hand, if you have thick or coarse hair, you can crank it up a bit.
Another important feature to consider is the plate material. Ceramic plates are great for distributing heat evenly, while tourmaline plates help reduce frizz. If you have curly or wavy hair, you might want to opt for a flat iron with floating plates, which can help smooth out your curls while adding shine. And let’s not forget about the size of the plates. For tighter curls, go for a smaller plate, while larger plates are better for loose waves.
Top Picks for Flat Irons
- Conair Infiniti Pro Ceramic Tourmaline Flat Iron – Great for all hair types
- Chi Ceramic Flat Iron – Perfect for smoothing and curling
- Rowenta MicroSteam Flat Iron – Ideal for adding moisture to your curls
Prepping Your Hair for Flat Iron Curls
Now that you’ve got the right flat iron, it’s time to prep your hair. This step is crucial if you want your curls to look fabulous and last all day. Start by washing your hair with a volumizing shampoo and conditioner. This will help add body and texture to your locks. Once your hair is clean, towel-dry it until it’s slightly damp. If you prefer to curl dry hair, make sure it’s completely dry before you start.
Next, apply a heat protectant spray. Trust me, this is a must-have step. Heat protectants help shield your hair from damage caused by high temperatures. Plus, they can add shine and reduce frizz. Once your hair is prepped and ready, it’s time to move on to the fun part—curling!
Read also:Chile Con Queso The Ultimate Cheese Sauce Thatll Melt Your Heart
Heat Protectant Recommendations
- Giovanni Direct Heat Protectant Spray – Affordable and effective
- Paul Mitchell Thermal Protection Spray – A favorite among stylists
- Tresemme Thermal Creations Heat Tamer Spray – Great for everyday use
Step-by-Step Guide: How to Curl Hair with Flat Iron
Alright, let’s get to the good stuff. Here’s a step-by-step guide on how to curl your hair with a flat iron:
Step 1: Section Your Hair
Divide your hair into manageable sections. This will make the curling process much easier and ensure even results. Use clips or bobby pins to keep the sections in place while you work on one section at a time.
Step 2: Heat Up Your Flat Iron
Set your flat iron to the appropriate temperature based on your hair type. Fine or damaged hair should be curled at around 300°F, while thick or coarse hair can handle temperatures up to 400°F.
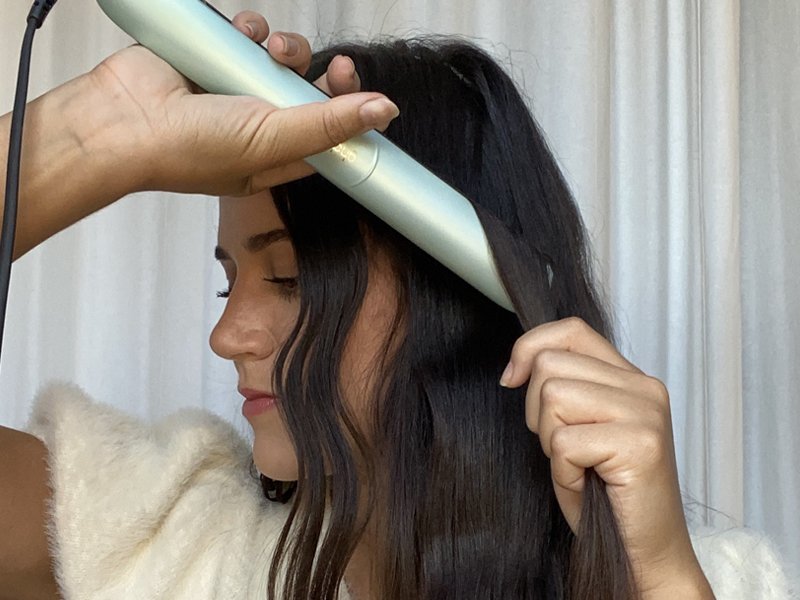
Step 3: Start Curling
Take a small section of hair and clamp the flat iron at the base. Slowly twist the flat iron away from your face while pulling it down the length of your hair. Hold for a few seconds, then release. Repeat this process for each section of hair.
Step 4: Finish with a Cool Mist
Once you’ve curled all your hair, spritz it with a light hairspray to set the style in place. This will help your curls last longer and prevent them from falling flat.
Tips and Tricks for Perfect Curls
Here are some insider tips to help you achieve flawless curls every time:
- Use a round brush to add volume before curling
- Don’t rush the process—take your time with each section
- Experiment with different twisting techniques to create various curl styles
Common Mistakes to Avoid
- Overheating your flat iron – this can damage your hair
- Skipping the heat protectant – your hair will thank you later
- Not sectioning your hair – this can lead to uneven curls
Creating Different Curl Styles with a Flat Iron
One of the coolest things about using a flat iron to curl your hair is the versatility it offers. You can create a variety of curl styles depending on your mood and occasion. Here are a few ideas to get you started:
Beachy Waves
For those effortless beachy waves, clamp the flat iron at the base of a section of hair and twist it away from your face. Release the iron halfway down the strand and continue twisting until you reach the ends. Repeat for each section of hair.
Tight Curls
If you’re going for tight curls, clamp the flat iron at the base of a small section of hair and twist it tightly around the iron. Hold for a few seconds, then release. This technique works best with a smaller flat iron.
Loose Waves
For loose, glamorous waves, clamp the flat iron at the base of a larger section of hair and twist it loosely around the iron. Release halfway down the strand and continue twisting until you reach the ends.
How to Maintain Your Curls
Now that you’ve spent all that time and effort creating those beautiful curls, you’ll want to make sure they last. Here are a few tips to help you maintain your curls throughout the day:
- Use a volumizing mousse before curling
- Avoid touching your curls with your hands
- Reapply hairspray as needed
Overnight Solutions
If you want your curls to last overnight, try sleeping with a silk scarf or pillowcase. This will help prevent frizz and keep your curls intact. You can also use a curl-enhancing spray to refresh your curls in the morning.
FAQs About Curling Hair with a Flat Iron
Q: Can I curl my hair with a flat iron if it’s already straightened?
A: Absolutely! In fact, many people prefer to curl their hair after straightening it for a smoother finish. Just make sure to use a heat protectant spray to prevent damage.
Q: How often can I use a flat iron to curl my hair?
A: It’s best to limit heat styling to a few times a week to avoid damaging your hair. Always use a heat protectant and deep condition your hair regularly to keep it healthy.
Q: What’s the difference between curling with a flat iron and a curling wand?
A: While both tools can create curls, a flat iron gives you more control over the process. With a flat iron, you can create tighter curls or looser waves depending on how you twist the iron. A curling wand, on the other hand, is great for creating natural-looking curls quickly.
Conclusion: Unlock Your Curling Potential
So, there you have it—everything you need to know about how to curl hair with a flat iron. From choosing the right tool to mastering different curl styles, this guide has got you covered. Remember, practice makes perfect, so don’t be afraid to experiment with different techniques until you find what works best for you.
And hey, don’t forget to share your newfound curling skills with your friends and family. Who knows? You might just become the go-to hairstylist in your circle. So, grab that flat iron, turn up the heat, and let’s make those curls pop!
Feel free to leave a comment below with your favorite flat iron curling tips or ask any questions you might have. And if you found this guide helpful, be sure to share it with your fellow curl enthusiasts. Happy curling, my friends!
Table of Contents
- Why Use a Flat Iron to Curl Hair?
- Choosing the Right Flat Iron for Curling
- Prepping Your Hair for Flat Iron Curls
- Step-by-Step Guide: How to Curl Hair with Flat Iron
- Tips and Tricks for Perfect Curls
- Creating Different Curl Styles with a Flat Iron
- How to Maintain Your Curls
- FAQs About Curling Hair with a Flat Iron
- Conclusion: Unlock Your Curling Potential