Alright, listen up folks! If you’re looking for an easy, creative, and downright fun way to get crafty this winter, you’ve come to the right place. Making a snowflake out of paper isn’t just about cutting shapes—it’s about unleashing your inner artist and creating something magical. And guess what? You don’t need any fancy tools or expensive supplies. All you need is some paper, scissors, and a little patience. So, let’s dive into how to make a snowflake out of paper like a pro!
Now, I know what you’re thinking. “Is it really that simple?” The answer is yes! Whether you’re a seasoned crafter or someone who’s never held a pair of scissors without hesitation, this project is totally beginner-friendly. Plus, it’s a great activity for kids, families, or even solo creators who want to add a touch of winter wonderland to their home. Trust me, once you start, you won’t be able to stop!
So, here’s the deal: this guide is packed with step-by-step instructions, pro tips, and even some fun facts about snowflakes. By the end of this article, you’ll not only know how to make a snowflake out of paper but also understand why they’re such a symbol of beauty and uniqueness. Ready to get started? Let’s go!
Read also:Jenise The Freak The Untold Story Of A Rising Icon
Table of Contents
- Materials You’ll Need
- Step 1: Preparing the Paper
- Step 2: Folding the Paper
- Step 3: Cutting the Snowflake
- Creating Unique Snowflake Variations
- Pro Tips for Perfect Snowflakes
- The Science Behind Snowflakes
- How to Display Your Snowflakes
- FAQ About Paper Snowflakes
- Final Thoughts
Materials You’ll Need
Before we dive into the nitty-gritty of making a snowflake out of paper, let’s talk about what you’ll need. Don’t worry, it’s not a long list. Here’s everything you’ll require:
- Paper (regular printer paper works great, but you can also use colored or decorative paper for added flair)
- A pair of sharp scissors
- A ruler (optional, but helpful for precision)
- Pencil (optional, for sketching designs)
See? Super simple, right? No need to run to the craft store for anything fancy. Let’s move on to the first step!
Step 1: Preparing the Paper
Alright, let’s start with the basics. The first step in making a snowflake out of paper is preparing your paper. You want to start with a square piece of paper. If you’re using regular rectangular paper, don’t panic—just fold it into a triangle and cut off the excess. Here’s how:
- Take a standard 8.5 x 11-inch sheet of paper.
- Fold one corner diagonally to form a triangle, making sure the edges align perfectly.
- Cut off the extra rectangle that sticks out. Voila! You’ve got yourself a perfect square.
This step is crucial because a square base ensures your snowflake will have symmetrical arms. Symmetry is key when it comes to snowflakes, both real and paper-made!
Why Start with a Square?
Starting with a square ensures that your snowflake will have equal sides, which is essential for that iconic six-pointed shape. Think of it like building a snowman—you want everything balanced and proportionate. Plus, it just looks way better when it’s done right, trust me.
Step 2: Folding the Paper
Now that you’ve got your square piece of paper, it’s time to fold it into the perfect snowflake shape. This part can seem tricky, but with a little practice, you’ll be folding like a pro in no time.
Read also:Dungeons And Dragons Dress To Impress Level Up Your Style With Epic Fantasy Fashion
- Fold the square paper in half diagonally to form a triangle.
- Take the bottom corner of the triangle and fold it up to meet the top corner, forming a smaller triangle.
- Repeat this process one more time, folding the triangle in half again.
- You should now have a narrow triangle. If it looks a little messy, don’t worry—you can always adjust the folds as you go.
Pro tip: Take your time with the folding. The more precise your folds, the better your snowflake will turn out. If you’re struggling, try using a ruler to help keep the edges straight.
Common Folding Mistakes to Avoid
One of the most common mistakes people make when folding their paper is not aligning the edges properly. This can lead to uneven arms on your snowflake, which kind of defeats the purpose. So, take your time and make sure everything lines up before moving on to the next step.
Step 3: Cutting the Snowflake
Alright, this is where the magic happens! Now that your paper is folded into a triangle, it’s time to start cutting. But before you grab those scissors, let’s talk about some basic rules:
- Never cut straight across the bottom edge of the triangle. This will give your snowflake a flat edge, which isn’t very snowflake-like.
- Feel free to experiment with different shapes and patterns. Curves, triangles, and zigzags all work great.
- Don’t be afraid to leave some areas uncut. This will help keep your snowflake strong and prevent it from falling apart.
Once you’ve made your cuts, carefully unfold the paper to reveal your beautiful snowflake. It’s like opening a present—so exciting!
How to Avoid Cutting Too Much
One of the biggest fears when making a snowflake out of paper is cutting too much and ending up with a flimsy, fragile design. To avoid this, start small and gradually add more cuts as you get more comfortable. You can always go back and add more details later if you’re not satisfied with the result.
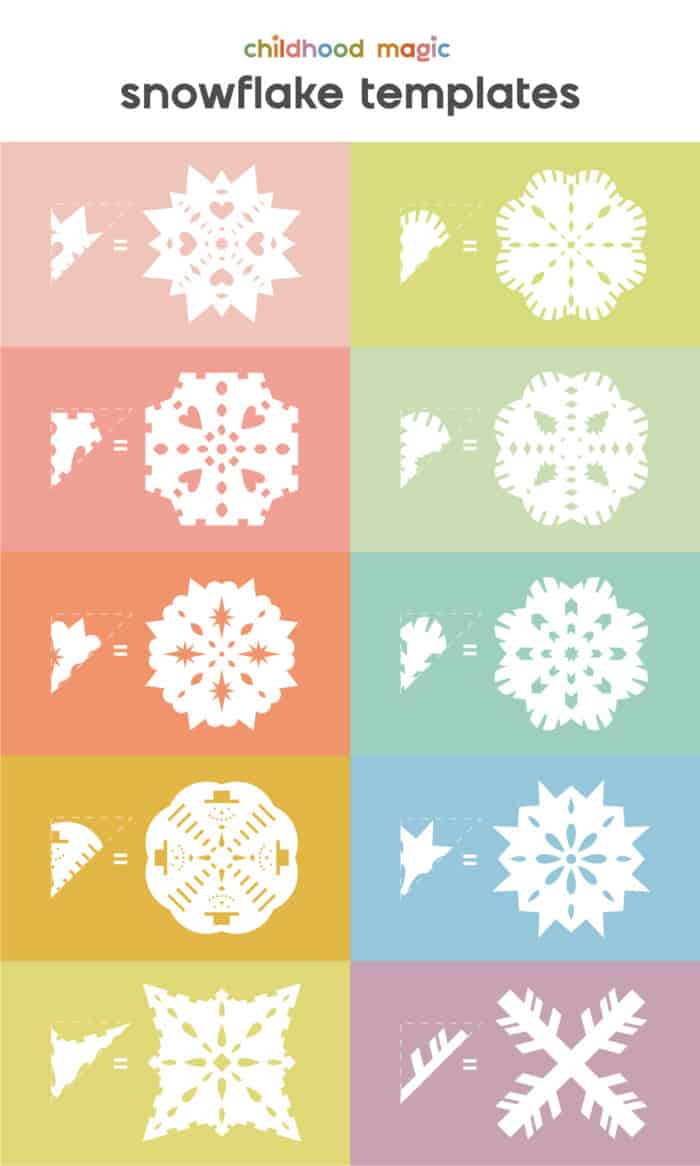
Creating Unique Snowflake Variations
Now that you’ve got the basics down, let’s talk about how to make your snowflakes stand out. There are endless possibilities when it comes to designing your paper snowflakes. Here are a few ideas to get you started:
- Star-shaped snowflakes: Cut small triangles along the edges for a classic star design.
- Floral snowflakes: Use curved cuts to create a more organic, flower-like appearance.
- Geometric snowflakes: Experiment with straight lines and angles for a modern look.
Remember, there’s no right or wrong way to design your snowflake. The beauty of this craft is that every snowflake is unique, just like the real ones in nature.
Using Different Types of Paper
Another way to add variety to your snowflakes is by using different types of paper. Try using colored paper, patterned paper, or even tissue paper for a delicate, translucent effect. The possibilities are endless!
Pro Tips for Perfect Snowflakes
Here are a few final tips to help you take your paper snowflakes to the next level:
- Practice makes perfect. The more snowflakes you make, the better you’ll get at cutting intricate designs.
- Use sharp scissors. Dull scissors can make cutting more difficult and lead to uneven edges.
- Experiment with different sizes. Smaller snowflakes are great for decorations, while larger ones make a bold statement.
And most importantly, have fun with it! Making snowflakes out of paper is all about creativity and self-expression. So, don’t be afraid to try new things and see where your imagination takes you.
The Science Behind Snowflakes
Now, let’s take a moment to appreciate the science behind real snowflakes. Did you know that no two snowflakes are exactly alike? It’s true! Snowflakes form when water vapor in the air freezes into ice crystals, and the shape of each snowflake is influenced by factors like temperature, humidity, and wind. Isn’t that amazing?
By making your own paper snowflakes, you’re not just creating a craft—you’re paying homage to one of nature’s most beautiful wonders. So, every time you cut a snowflake, remember that you’re part of a long tradition of humans marveling at the beauty of snow.
Fun Facts About Snowflakes
Here are a few fun facts to impress your friends:
- Snowflakes always have six sides because of the molecular structure of water.
- The largest snowflake ever recorded was 15 inches wide and 8 inches thick.
- Snowflakes can travel thousands of miles before reaching the ground.
Who knew snowflakes were so fascinating?
How to Display Your Snowflakes
Once you’ve made your snowflakes, it’s time to show them off! Here are a few ideas for displaying your creations:
- Hanging decorations: Use string or fishing line to hang your snowflakes from the ceiling or windows.
- Wall art: Frame your favorite snowflakes and hang them on the wall for a unique piece of art.
- Gift tags: Attach small snowflakes to gifts for a personal touch.
Whatever you choose, make sure your snowflakes are visible and appreciated. They’re too beautiful to hide away!
FAQ About Paper Snowflakes
Here are some frequently asked questions about making snowflakes out of paper:
Can I use any type of paper?
Absolutely! While regular printer paper works well, you can also use colored, patterned, or even tissue paper for different effects.
Do I need special scissors?
Nope! A regular pair of sharp scissors will do just fine. However, if you want to get fancy, you can use decorative edge scissors for added flair.
How long does it take to make a snowflake?
It depends on your skill level and the complexity of your design. Beginners might take 10-15 minutes per snowflake, while more experienced crafters can whip one out in just a few minutes.
Final Thoughts
And there you have it—everything you need to know about how to make a snowflake out of paper. From preparing your materials to displaying your finished creations, this craft is a fun and rewarding way to bring a little winter magic into your life. Remember, the key is to have fun and let your creativity shine. So, grab some paper and scissors, and get crafting!
Before you go, I’d love to hear from you. What’s your favorite part about making snowflakes? Do you have any tips or tricks to share? Drop a comment below and let’s keep the conversation going. And don’t forget to share this article with your friends—after all, more snowflakes mean more fun!