Who doesn’t love the elegance of a perfectly drawn bow? Whether you're sketching for fun or aiming to master the art of drawing bows for professional work, this guide has got you covered. From creating ribbon-like bows to adding intricate details, we’ll walk you through every step of the process. So grab your pencil, and let’s dive into the world of bow drawing!
Drawing a bow might seem like a daunting task at first, but trust me, it’s easier than tying one in real life. This guide is designed to help beginners and seasoned artists alike. You’ll learn the basics, some pro tips, and even discover how to add your unique flair to make your bow sketches stand out.
Let’s face it, bows are everywhere—from gift wrapping to fashion accessories, they’re a timeless classic. Knowing how to draw one can come in handy for countless creative projects. So, whether you’re doodling during a meeting or working on your next masterpiece, this guide will teach you how to draw a bow like a pro.
Read also:Maya Le Clark The Rising Star In The Spotlight
Why Learn How to Draw a Bow?
Ever wondered why bows are such a popular subject in art? It’s simple—they’re versatile! Bows can be drawn in various styles and sizes, making them perfect for different projects. Plus, mastering this skill can boost your confidence as an artist. You’ll find yourself incorporating bows into your work more often once you get the hang of it.
Here’s the deal: bows aren’t just for gift wrapping anymore. They’re a symbol of elegance, playfulness, and creativity. By learning how to draw a bow, you’re not just adding a new trick to your artistic arsenal; you’re unlocking endless possibilities for your creative projects.
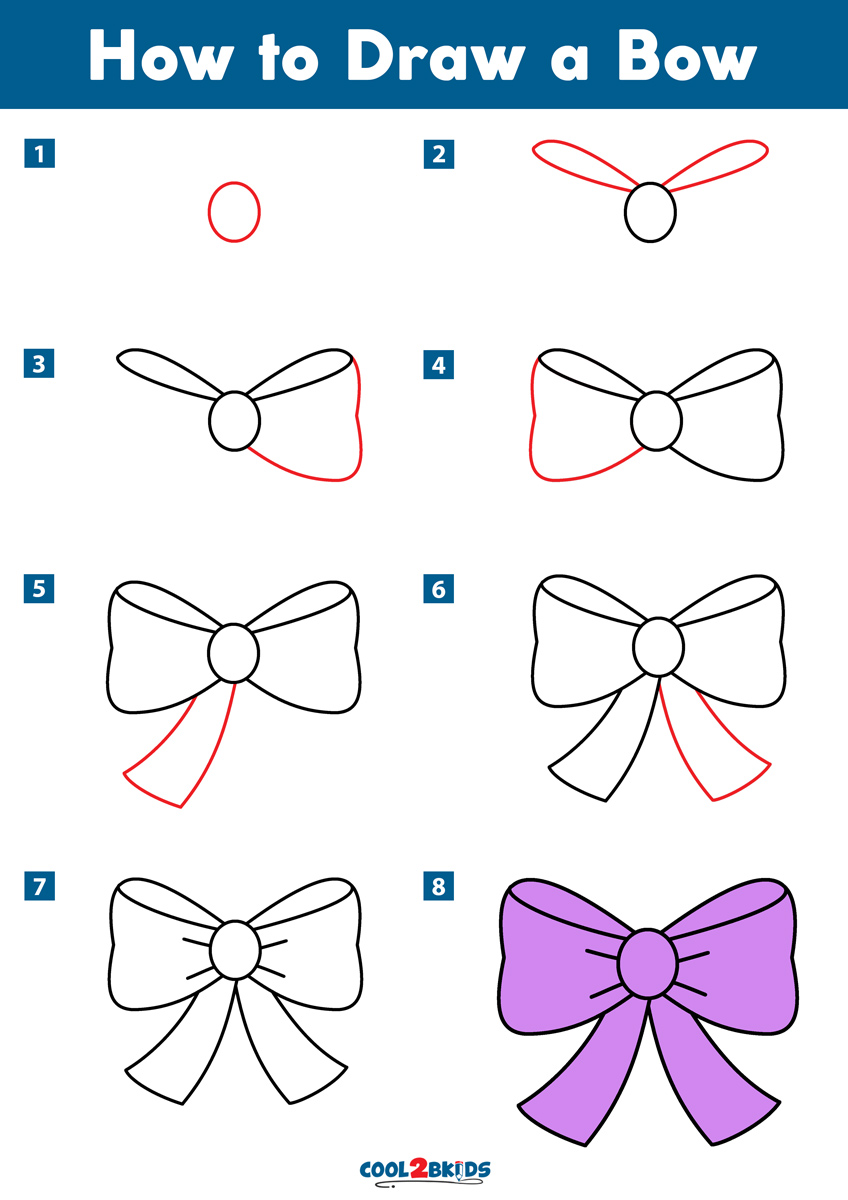
Basic Steps to Draw a Perfect Bow
Alright, let’s get down to business. Drawing a bow doesn’t have to be complicated. Follow these simple steps, and you’ll be sketching bows like a champ in no time.
Step 1: Start with the Ribbon Loops
Begin by drawing two oval shapes side by side. These will form the loops of your bow. Don’t worry if they’re not perfect circles; bows are meant to look a little imperfect to add charm.
Step 2: Add the Knot
Now, draw a small rectangle in the center of the two ovals. This will serve as the knot that holds the loops together. Keep it proportionate to the size of your loops for a balanced look.
Step 3: Sketch the Tails
Extend two curved lines downward from the knot. These will be the tails of your bow. You can make them straight or wavy, depending on the style you want to achieve.
Read also:Ultimate Guide To Ulta Birthday Gift 2024 Unwrap The Best Beauty Surprises
Pro Tips for Drawing Realistic Bows
Want to take your bow drawings to the next level? Here are some expert tips to make your bows look more realistic:
- Add texture to the ribbon by drawing subtle lines along the loops and tails.
- Experiment with shading to create depth and dimension.
- Play around with different ribbon widths to add variety to your bows.
Remember, practice makes perfect. The more you draw, the better you’ll get at capturing the essence of a bow on paper.
Understanding Different Bow Styles
Not all bows are created equal. Depending on the occasion or medium, you might want to draw different types of bows. Here’s a quick rundown of some popular styles:
Fancy Gift Bows
These bows are typically large and symmetrical, perfect for adorning gifts. Focus on creating uniform loops and tails for a polished look.
Simple Ribbon Bows
For a more casual approach, try drawing smaller, asymmetrical bows. These work great as fashion accessories or decorative elements in your artwork.
Cartoonish Bows
If you’re drawing for kids or creating fun illustrations, go for exaggerated shapes and vibrant colors. Think big loops and playful tails!
Tools You’ll Need
Before you start, make sure you have the right tools for the job. Here’s what you’ll need:
- A good quality pencil or pen
- A clean sheet of paper
- An eraser (because mistakes happen)
- Colored pencils or markers if you want to add color
Having the right tools can make a huge difference in your drawing experience. Invest in quality materials, and you’ll notice an improvement in your artwork.
Common Mistakes to Avoid
Even the best artists make mistakes. Here are a few common pitfalls to watch out for when drawing bows:
- Making the loops too small or uneven
- Forgetting to add texture to the ribbon
- Ignoring the proportion between the loops and tails
By keeping these tips in mind, you’ll avoid common errors and create bows that look professional and polished.
Adding Color to Your Bow
Once you’ve mastered the basic shape, it’s time to bring your bow to life with color. Here’s how:
Choose Your Palette
Pick colors that complement the purpose of your bow. For example, use festive colors for holiday-themed drawings or pastels for a more delicate look.
Experiment with Shading
Use lighter and darker shades of the same color to create depth. This technique will make your bow look more three-dimensional and realistic.
Incorporating Bows into Your Artwork
Bows aren’t just standalone drawings. They can enhance various types of artwork. Here are some ideas:
- Add bows to fashion sketches for a chic touch
- Incorporate bows into greeting card designs for a personal feel
- Use bows as decorative elements in landscape or still-life drawings
The possibilities are endless. Let your creativity run wild and see where bows can take your art!
Practicing Your Skills
Like any other skill, drawing bows takes practice. Here are some exercises to help you improve:
- Draw bows of different sizes and styles daily
- Challenge yourself to draw bows from memory
- Study real bows to understand their structure and proportions
Consistency is key. The more you practice, the more confident you’ll become in your abilities.
Conclusion: Master the Art of Drawing Bows
And there you have it—your complete guide to drawing bows. Whether you’re a beginner or a seasoned artist, these tips and techniques will help you create stunning bow sketches. Remember, the key to success is practice and patience.
Now it’s your turn! Grab your pencil and start drawing. Don’t forget to share your creations with us in the comments below. And if you found this guide helpful, be sure to check out our other articles for more artistic inspiration.
Table of Contents
- Why Learn How to Draw a Bow?
- Basic Steps to Draw a Perfect Bow
- Pro Tips for Drawing Realistic Bows
- Understanding Different Bow Styles
- Tools You’ll Need
- Common Mistakes to Avoid
- Adding Color to Your Bow
- Incorporating Bows into Your Artwork
- Practicing Your Skills
- Conclusion: Master the Art of Drawing Bows
So, what are you waiting for? Let’s get drawing!